I have a busy class this year!
I know, I know. Don’t we all?
Aren’t all 5 year olds busy??
Mostly, yes :) But still, this year is one of my busier years. Which is fine by me! When I have busier classes, I find that I stretch myself even more than usual to try new things and become the best teacher I can be. Because, let’s face it, when we have an “easy” class (as with just about anything in life), we have to be even more disciplined to try new things and grow… and I find myself taking the easier way out more often.
And those years are great to rest and recharge! But, this year is not one of those years ;)
All of that to say, this year I have been trying lots of new ideas to try and get my students as engaged as possible. In my experience, engagement is the name of the game. When our students’ busy brains and bodies are engaged, there is less time for them to spend making questionable choices. And they learn more!
One idea that I tried a few weeks ago I will be sharing with you today. But before I share what we did, here is a little disclaimer:
90% of the time, I follow this philosophy:
Do not spend more time prepping for an activity than it takes for your students to perform it.
AKA, be efficient. Create things that you can use over and over. Don’t reinvent the wheel. Use your time wisely. Make sure your students are doing the work, and not you.
But, every now and then, an idea comes along that makes me abandon said philosophy, give up a little of my personal time, and provide my students with a really fun and exciting activity, even if it takes awhile to set up and can only be used once. Such was the case the other day, when we played…
GIANT SIGHT WORD TWISTER!

Giant sight word Twister was so fun, and so funny, that I would play it again in a heartbeat – despite the fact that it took about 40 minutes to set up and we only played for about 20-25 minutes. And it will always take that long to set up; there aren’t really any short cuts that I have been able to think of to make set-up more efficient.
But, seriously… it was SO FUN. And my students were SO INTO IT! And their bodies were moving and their brains were working and we were practicing the sight words that have been tripping us up the most.
Also, while it did take some time, it didn’t cost me any money. Which is a major plus!
So, if you have some extra time and are interested in playing this game with your students, read on to find out how!

1. CHOOSE YOUR WORDS
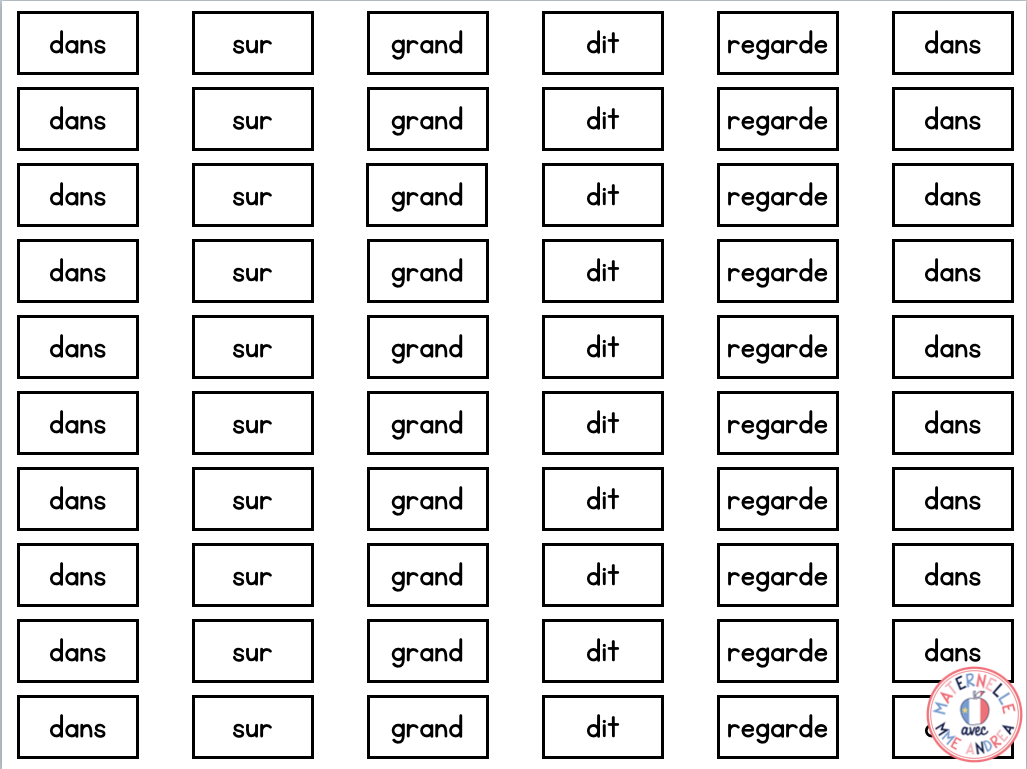
I picked five words for our game – regarde, grand, dit, dans and sur. My students are always mixing up regarde/grand and dit/dans. And sur is just hard for us to remember this year, for whatever reason.
In future, I might decide to go with four words instead, because some kids weren’t quite long enough to reach from one end of the board to the other.
You could handwrite them on half sheets of paper, but I suggest that you type up your words – here is a link to the editable template that I used. Just type in the words you want and print! You can change the font to anything you want (I used KG Primary Penmanship) and add or delete pages, depending on how many you need. So quick and easy!
* Make sure you print enough words – for 17 students, I printed 20 copies of each word.
I printed my words on regular white copy paper. I stuck them to the floor with packing tape. I lucked out and had wonderful help from a TA (I don’t normally have one!) while sticking them to the floor – together it took us about 20 minutes, but would have definitely taken longer by myself.
2. SET UP YOUR SPINNER
I found a free spinner online that was customizable! It is called Wheel Decide and was super easy to use.
You can find it by clicking right HERE.
I just typed in the body part (main/pied gauche/droit) + the sight word, so there were four choices for each word on the spinner – 20 in all.

3. MOVE YOUR FURNITURE
This game is giant! Unless you have a big space available, you will likely have to push your classroom furniture to the sides of your room.
Pro tip – if your students are anything like mine, you may want a broom on hand. You might find some surprises ;)
You may want to place a few chairs around the perimeter of the game surface as well.
4. PLACE YOUR WORDS
I set mine up like “real” Twister, with all the same words in the same row. I had printed 20 of each word, so I set it up in ten rows of ten. I did a little graph to show you because I can’t figure out a clear way to explain it with words!
In real life, the game was even bigger and each row was repeated again :)
Next time, I might try a different way and mix the words up, rather than placing them in rows. As I said above, some students had a hard time reaching when one body part was on the first row and they had to stretch another to the fifth row!
5. PLAY!
Play just like you would play regular Twister! I let all of my students go at the same time – we didn’t take turns or go one at a time because I didn’t want them to be waiting around. If you had students who are older or better at waiting, you could get them to go one at a time or in groups (five at a time, for example).

I had my TA be in charge of the spinner so that I could make sure they were choosing the correct words… and to play a few rounds, too ;)
While I did check words, I did not police left and right as far as hands and feet went. Practicing sight words was the priority, so that’s what I paid attention to!
If a student fell, I just had them pop out of the game for one spin and then join back in. This was helpful for spacing students out. I also let them share words – the cards were big enough that three of their little hands could comfortably share a spot.
We didn’t play competitively, but if you wanted to play for a winner, I would give the students that are “out” another task, like writing the spun sight words on a white board. The point of the game is to master tricky words, so make sure that if you have students not actively participating in the game, they are doing another activity with the words!


Well, there you have it! How to play Sight Word Twister, en français!
I would love to know if you give this game a try with your students – drop me a note in the comments!
If you are looking for another fun whole-class sight word game (with much less prep time, and also no cost to you), check out this blog post to see how we play Pieuvre (instructions are near the end of the post).
If you are interested in knowing which sight words I teach and how I do it, check out this blog post.
If you are like me and are just starting your March Break, have so much fun! I hope you have lots of time to relax and recharge and feel ready for the home stretch <3

PS – Are you a member of my FREE Resource Library for French primary teachers? If not, what are you waiting for?? Sign up below for access to every freebie I’ve ever made… and will ever make!