Hi guys!
In case you are late to the party, I have been sharing how I run literacy centres in my classroom over the past few weeks. You can find out how I start centres in this post, how I organize them over here, and see ALL of the centres I have posted about so far by clicking here.
This week, I will be talking about our fine motor centres! Fine motor centres are my favourites – and my students’, too! They are lots of fun and allow my students time to play, while simultaneously working on those all-important fine motor skills.
Don’t feel guilty about including these – don’t feel that they aren’t “real” literacy centres. Children, especially at this age, NEED to participate in activities that help develop their little finger muscles if we want them to be able to cut, colour, and (most importantly!) write neatly and efficiently.
Plus, they are four and five years old! They learn through playing – let them play! Read on for some tips and ideas for how to organize and incorporate fine motor centres into your centre rotation.
I kind of touched on how I organize my fine motor centres in this post. Just to recap, I run two fine motor centres at a time – a blue (A) and a red (B). To help my students stay independent, the centre cards on my centre board are both the same colour as the bins they are housed in, and each have a picture with the corresponding letter (A or B). Twice the potential for them to find the right bins ;)
I always have three choices for each fine motor centre – three reds and three blues. Generally, all the red centres are different than the blues. Here are how they look on my shelf:

All of my other centres are housed in one bin. However, for these centres, I wanted my students to have choices – they can choose which activity they want to complete (and keep all the parts organized!), and they can choose to work alone or with their partner. I switch out one of the reds and one of the blues generally once a week – in the beginning, I thought that I would have to switch them out more often, but so far my students seem to enjoy being able to play with the same thing more than once if they so choose. I have eight groups of students and we do two rotations per day, so they are at each centre generally once a week.
Each time I add a new activity, I teach them how to do it! I always, always bring all of my students to the carpet before each centre rotation, which provides me with a great moment to introduce a new activity right before sending them off. I also show them how I expect the activity to be cleaned up. This is key, and you may have to show them that more than once!!
So, what kinds of activities do I put in there? Here are a few if the things we have explored so far this year!


Kinetic sand! I bought two packs at Michaels (on two different days with two different coupons, haha), and two pencil boxes to store it in. I have a few molds and tools that they can use to manipulate it, and I have figured out that it is really smart to give them a cookie sheet to use to play on ;)
My students love this one so much that it is the only thing so far that I have included in both a red and a blue bin at the same time!

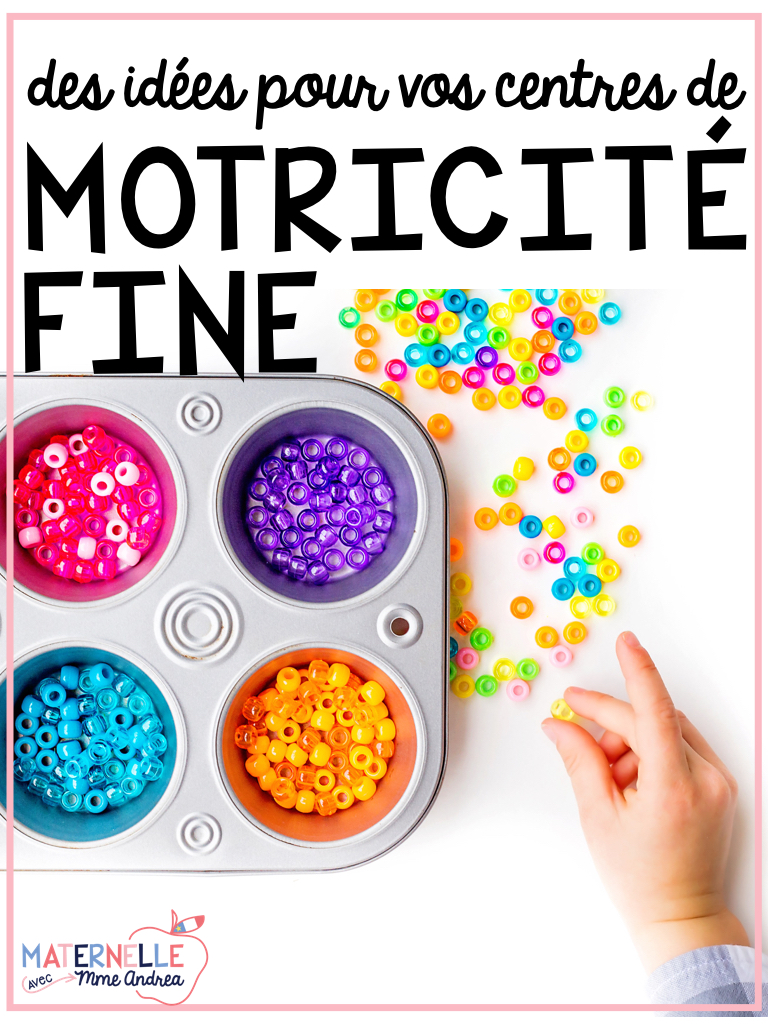
Sorting with scoopers and tweezers! I bought a muffin tin from the dollar store and the Scoopers on Amazon. I show students how to sort our math counters using the tweezers by colour, shape, size, etc. This is a good one because it covers some math, as well! You can also challenge them to try to pick up more than one object with the same attribute at the same time.

Beading! I buy large pony beads and give my students pipe cleaners. I show them how to twist the ends so their beads don’t fall off – it has gone really well so far. This is a definite favourite! We haven’t learned patterning in math yet, but you could definitely encourage patterning if you wanted.

I also found these perler bead sets at Dollarama. It’s a Halloween set, so perfect for this time of year! The “real” goal is to make the included pictures (and iron them together – ha! not happening), but my students mostly just use the tweezers to place the beads on the orange spikes.

Counting with tweezers – Use your imagination a bit for this one… I meant to buy pumpkin seeds and totally forgot! We are using pompoms instead. One partner says a number between one and 10, and the other partner scoops that many pompoms onto the pumpkin. The pumpkins are a free download from Tara West, that you can grab right here!

Lacing cards! These ones are from Scholastic.

Math screws – I have no idea what the “technical” name for these are. I found them in my school library, but I believe they are from Learning Resources. They are for shape and colour matching – students find a shape and screw it onto the corresponding screw. Fine motor centres are awesome for those little resources that your school purchases that aren’t enough for your whole class and you have no idea what to do with (or is my school the only one who does that, haha?)!

Lite Brite!!!
This is a HUUUUGE hit. And it is really good for their fingers – those little plastic things are tough to get in and out! We are doing pictures for now, but later I will add sheets for letters and sight words.
Lite Brite is crazy expensive (in my opinion), but I got this one at a yard sale over the summer for like 5$!
There are so many other ideas that work well for these centres as well. Locks & keys, clothespins, hole punches, Play Doh, chop sticks, geo boards & elastic bands, etc.! Visit your local dollar store and see what you can find.
I also have a Pinterest board where I pin every fine motor centre activity that I see float across Pinterest. If you do or plan to do fine motor centres in your classroom, go give it a follow! I am updating it all the time, and there are links to all kinds of freebies.
I hope this post was helpful to you! This is the first year that I have added these centres to our rotation, and I am SO GLAD that I did. As I said above, they are both my favourites and my students’ favourites! I highly recommend that you give them a try!